Let’s Create a Water Character in Procreate!
I’ll share time-lapses of my work, and usually, the focus of any commentary surrounding it is the decision making and the story being told.
I thought I’d make sure that as today's illustration comes together, you’ll understand the steps I've taken to get there since I get so many questions about the technical aspects of my sketches.
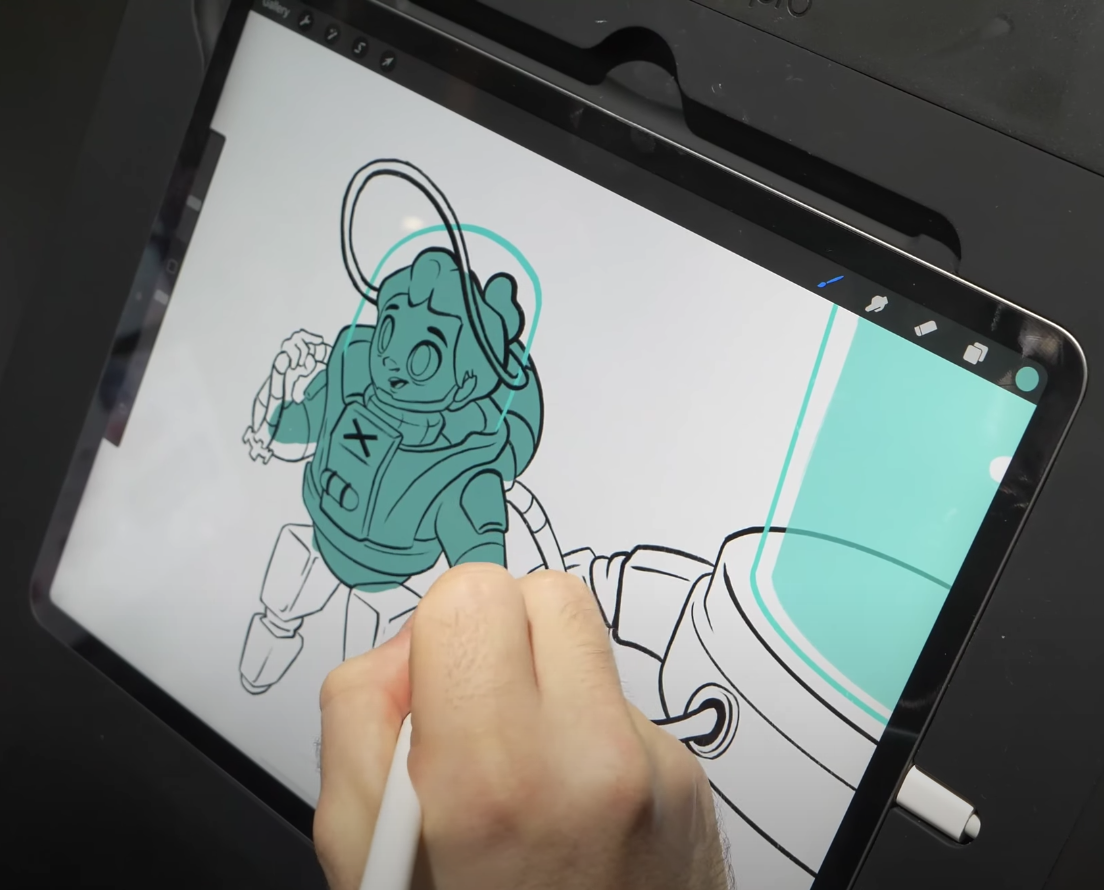
Today I’m using Procreate on the iPad to create a water character to add to the same universe as my Mushroom Forager. I use an iPad Pro typically, but many steps I share are fairly universal no matter the app that you use.
So follow along and discover how easy it is to create a water-character design concept in Procreate!
(Pssst! If there’s anything you still have questions about or you just want to focus on learning Procreate, I have a HUGE guide that I put up a while ago right here)
Watch this video now!
Let me Introduce you to Our Water Character
We’re following up on an older character we designed on this channel in the past, our Mushroom Forager.
Her story is that she lives in a post-apocalyptic scenario where noxious and poisonous mushrooms put off such deadly spores, that she collects some of the only pure air she can find…. aaaaaand seals it away into potato chip bags.
This character will live in the same environment and sell water from a walking robotic water tank.
Let’s Talk Tools:
I start out in Procreate on a 3500x2500 300 DPI canvas.
I’m using a brush here called Tara’s Oval Sketch, available via DizzyTara’s Gumroad. This brush is great because at a small size it works like a pencil, but when it’s larger it’s like a fat pastel.
Let’s Break Down the Steps:
Start with Basic Shapes
I start iterating very small, working out the basic shapes of my character, which is easier to do in broad strokes when they’re small.
I’ve decided that the character will walk with prosthetic robot legs that will match her water tank’s legs.
2. Erase Shapes
Once I have a silhouette that I like, I start erasing away from my shapes with the same Oval Sketch brush as an eraser.
3. Scale-up and Sketch Overtop
I scale that up with the cursor tool, and on a new layer, start sketching overtop of it with a smaller brush to figure out the details.
In a couple of places (like the arms) I draw in another layer with a different color just in case I want to change something. It’s all about iterating.
As I’m trying to figure out the shapes of the water tank itself, I actually open up Procreate’s Perspective tool to lay down two vanishing points. You can find this tool in the Settings menu under “drawing assist”.
It’s actually the same tool I used to get a symmetrical reservoir at the very beginning of the sketch. This makes it so that I have a place I can put the four feet.
Now as I’m developing this walker, I realize that I could spend a long time getting all of the proportions just right on this big mechanical hard surface walker, or I could spend a fraction of that time modeling the walker in zBrush.
This ends up being a surefire way to know that my legs are all the right shape, oriented the right way, and (cherry on top) was just a more enjoyable process to go through. (Check out this detailed process with my video: How To Make Easier Props, Backgrounds & Environments—and No, It’s Not Cheating!)
Could I have gotten the same result with pure drawing? Absolutely. Mind you, this is no replacement for a good understanding of how to draw construction and perspective, but to expedite things it worked out great.
And you can see that I add a lot more details over top of this, I just use the model as a base.
Looking to perfect your understanding of how to draw construction and perspective? Check out Module 1: Drawing from my online course, Learn Character Design.
step 4. Add color and lower opacity
I add a solid color layer for the water, then I lower the opacity of my sketch.
This can be done either through lowering the opacity of a layer through the layers menu, or as I did here, using a white fill layer that has lowered opacity.
Step 5. Create an Ink Layer and use Oval Ink
Next, I create an ink layer and use a variant on the Oval Sketch called Oval Ink. It just lacks the chalk texture and draws a lot smoother.
I have both of these brushes programmed as quick actions on the menu I customized when you tap the screen or swipe in a particular direction.
I messed with the face of this character a few times, and the one I end up with is changed towards the very end.
To color in a line, lock the opacity of the layer (two fingers towards the right on a layer) so that you see the checker pattern. I also have Alpha Lock as one of my Quick actions.
Step 6. Fill in the Drawing with Color
There are ways to fill in the drawing with color, but I tend to prefer doing it manually. That way there’s no chance of pixel artifacting.
I fill in with flat color on a new layer underneath the lines, and now I can use clipping masks for all of the color details.
Clipping masks are layers that depend on whatever is underneath them. So if I draw outside the lines, it will only register on the layer it’s clipped to.
I use a soft Airbrush which comes as a stock brush in Procreate, scaled up, in order to get the gradient effect on the water tank. I use a solid fill with low opacity for the character’s helmet.
Step 7. Create a Clipping Mask and Erase
Once I have my flat colors, I create a new clipping mask with a light purple color, and this layer I set to multiply in the layers panel, then lower the opacity.
From here, I erase away areas in the piece where light is hitting, so that all that’s left is our shadow. I use soft and hard brushes. This is a good starting point for the look of our character.
(Are you interested in improving the quality of your character’s expressions? Check out Module 4 “Pose and Expression” in the Learn Character Design Course. It will teach you how to create more interesting and expressive character designs and poses.)
Step 8. Hone Visual Interest
Now in a new layer, I start using lighter colors to go over places where there might be some highlights or areas where light is hitting more intensely, this also just gives us places for visual interest.
Step 9. Create the Environment
Next, I create the ground and environment that this character is in, which is similar to the one our forager was in, this time I wanted to go slightly bigger with the mushrooms.
There are a few more things to do to set the scene a little better. For one, we want some cast shadow on the ground beneath. A soft brush and some carving with the eraser does the trick.
We also want a noxious, grungy feeling for this environment, so for that, we’ll add some texture to the character and background. For most of this, I use a Gouache brush to imply mud, dirt, and scum.
Step 10. Add Final Touches
Last up, I add a little bit more shadow and light, and as a final touch, a decal on the water tank, and a little symbol, Running Water.
And that’s it! In just ten simple steps we’ve made a detailed, new water character in Procreate on the iPad. Don’t be daunted, it’s much easier than it seems.
Do you have any other questions about Procreate? Need some extra pointers?
Check out these other videos I have about Procreate right here:
We talk about good character design overall in my course Learn Character Design. And make sure you’re following over on Instagram @bageldenizen, we’ve been sharing a lot there recently.
Now, I want to hear from you. What sort of character are you creating in Procreate right now? Let me know in the comments section below! Thanks for reading, and have fun creating!
Do you Want to Master your Digital Art and Character Design Skills?
You Can Do it in Just Six Steps
Hey! I’m Brookes Eggleston…
If you’re new here, welcome! I’ve worked in studio settings and in a freelance capacity as a Character Designer, Illustrator, Story Artist, and 3D Modeler for nearly 15 years. But what I love as much as drawing characters is sharing what I’ve learned. Get to know my mission here at Character Design Forge.
